
Custom Loss in Keras
(from Naive to Example-wise Weighted)
本篇介紹使用Keras時如何客製化損失函數(custom Loss function),從簡單至複雜的客製化程度介紹。順道一提,因為工作太忙拖稿了有點久,加上本來是因應自己需求面example-wise weighted custom loss,但發現這樣文章不通順,還是從簡易的built-in loss慢慢延伸到複雜的比較好吸收。
文章會按照以下的順序介紹,希望閱讀者能夠比較好吸收:
- Built-in Loss Function
- Custom Loss Function (Mirror)
- Custom Weighted Loss Function for Mis-classification Usecase
- Custom Weighted Loss Function for Mis-classification Usecase (example-wise)
Built-in Loss Function
就以底下這個典型MLPL多分類模型當作例子,首先,輸入樣本的個數是k=100,而輸入及輸出樣本的維度是5及3
接著,以下範例使用Functional API建置MPL模型進行訓練。使用built-in loss非常簡易,只要將字串(name of objective function)傳入model.compile的參數loss就行了;例如,我們的多分類例子使用'categorical_crossentropy'。
import numpy as np
import keras.backend as K
from keras.layers import Input, Dense, Activation
from keras import Model

# Prepare training data
train_X = np.random.randn(100, 5)
train_Y = np.random.randint(100, 3)

# Define model structure
data_input = Input(shape=(5,))
dense_layer = Dense(3)(data_input)
data_output = Activation('softmax')(dense_layer)

# Build model
model = Model(data_input, data_output)

# Compile model
model.compile(optimizer='Adam',
              loss='categorical_crossentropy',
              metrics=['accuracy'])

# Fit model, i.e., training
model.fit(x=[train_X], y=[train_Y],
          epochs=100, batch_size=32)
Custom Loss Function (Mirror)
接著,我們不要用字串而是將objective function傳入model.compile的參數loss也能達到與上面同樣的目的;這就是custom loss function的第一個步驟: 一定要定義一組函數帶有兩個參數,y_true是true label,y_pred是prediction label,Keras會在每個batch training此函數,並對batch samples執行loss計算。
def mirror_loss(y_true, y_pred):
    return K.categorical_crossentropy(y_true, y_pred)

custom_loss = mirror_loss

# Compile model with custom loss
model.compile(optimizer='Adam',
              loss=custom_loss,
              metrics=['accuracy'])
Custom Weighted Loss Function for Mis-classification Usecase
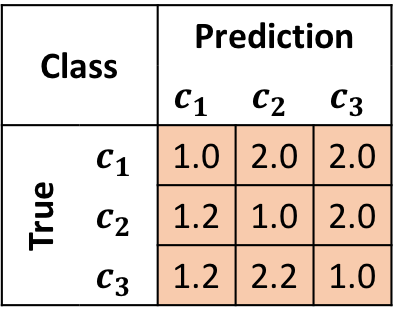
根據應用面的不同,可能會需要針對預測錯誤的組合給予不同的權重,長得像下面這行公式一樣。
$Loss^k = W_{i, j} * \operatorname{crossentropy_{categorical}}(y_{true}^k, y_{pred}^k)$, where $i = {\operatorname{argmax}}(y_{true}^k)$, $j = {\operatorname{argmax}}(y_{pred}^k)$
假設第k個輸入的true label是第1類,但是被model預測為第2或第3類時,我希望loss權重高一點,例如2.0;再來,假設其true label是第2或3類,但是被model預測為第1類時,傷害沒那麼大,那我給予較低權重例如1.2,那我們可以有一組權重表格W產生出來,給予錯誤的組合不同的loss權重。
那先備妥一組table後,要如何塞入custom loss function呢?
# Create our mis-classification weight table from the above
weight_table = np.ones((3,3))
weight_table[2,1] = 1.2
weight_table[1,2] = 2.0
...
weight_table[2,2] = 2.0
好,一樣先定義一組function,除了必要的兩個參數,再額外加入另外一組參數y_weights給table輸入用。 注意,mis_cls_w_loss的implmenetation就是上面那行公式,有興趣可以剖析看看。
# Define custom mis-classification weighted loss
def mis_cls_w_loss(y_true, y_pred, y_weights):
    nb_cl = y_weights.shape[1]
    final_mask = K.zeros_like(y_pred[:, 0])
    y_pred_max = K.max(y_pred, axis=1)
    y_pred_max = K.expand_dims(y_pred_max, 1)
    y_pred_max_mat = K.equal(y_pred, y_pred_max)
    for c_p, c_t in product(range(nb_cl), range(nb_cl)):
        final_mask += (K.cast(y_weights[c_t, c_p], K.floatx()) * K.cast(y_pred_max_mat[:, c_p], K.floatx())* K.cast(y_true[:, c_t], K.floatx()))
    return K.categorical_crossentropy(y_true, y_pred) * final_mask
等等,記得上節說過的一定要定義一組函數帶有兩個參數,因為Keras custom loss只接受此格式,所以我們還要再另外包裝mis_cls_w_loss;你可以選擇以下其中一種,記得不要落入lambda的陷阱,或是使用functool.partial包裝,如下。
# Closure the weight tabel into custom_loss
custom_loss = lambda y_true, y_pred: mis_cls_w_loss(y_true, y_pred, y_weights=weight_table)

# Re-package the custom loss using functool.partial
custom_loss = partial(mis_cls_w_loss, y_weights=weight_table)
Custom Weighted Loss Function for Mis-classification Usecase (Example-wise)
進階版,如果需要精細到每個樣本的預測錯誤權重不同呢? 公式跟上節的只有微小差異,在於$w_{i, j}^k$的上標k代表每個樣本都有各自的權重表格。
$Loss^k = w_{i, j}^k * \operatorname{crossentropy_{categorical}}(y_{true}^k, y_{pred}^k)$, where $i = {\operatorname{argmax}}(y_{true}^k)$, $j = {\operatorname{argmax}}(y_{pred}^k)$
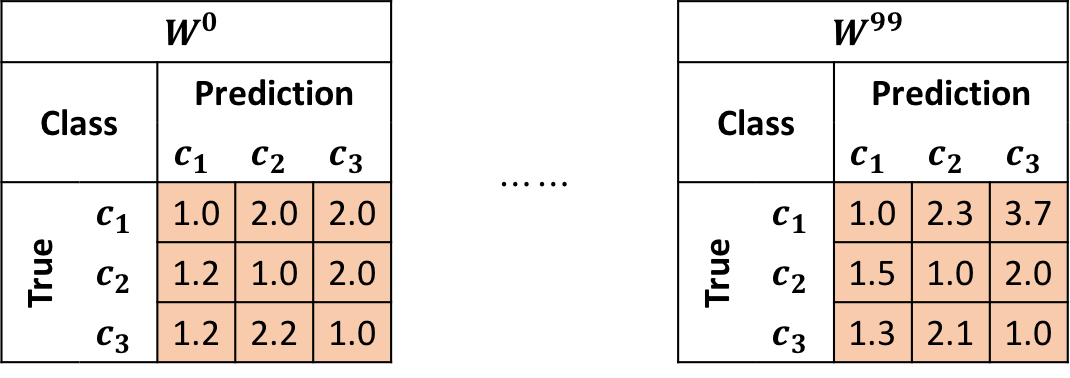
所以我們weight table以及custom loss function程式碼只有些微的改變,要注意的是維度的部分,weight table的維度是(100, 3, 3)。
# Create our mis-classification weight table per example
weight_table = np.ones((100, 3, 3))
weight_table[0, 2, 1] = 1.2
weight_table[0, 1, 2] = 2.0
...
weight_table[0, 2, 2] = 2.0
...
...
weight_table[99, 2, 1] = 3.2
weight_table[99, 1, 2] = 0.8

# Define custom mis-classification weighted loss
def mis_cls_w_loss(y_true, y_pred, y_weights):
    nb_cl = y_weights.shape[1]
    final_mask = K.zeros_like(y_pred[:, 0])
    y_pred_max = K.max(y_pred, axis=1)
    y_pred_max = K.expand_dims(y_pred_max, 1)
    y_pred_max_mat = K.equal(y_pred, y_pred_max)
    for c_p, c_t in product(range(nb_cl), range(nb_cl)):
        final_mask += (K.cast(y_weights[:, c_t, c_p], K.floatx()) * K.cast(y_pred_max_mat[:, c_p], K.floatx())* K.cast(y_true[:, c_t], K.floatx()))
    return K.categorical_crossentropy(y_true, y_pred) * final_mask

# Re-package the custom loss using functool.partial
custom_loss = partial(mis_cls_w_loss, y_weights=weight_table)
再來這裏是重點部份,因為是example-wise,loss在計算時是以batch為單位.上方的y_weights[:, c_t, c_p]就是在抓取一個batch量的table,在這個的例子中是(32, 3, 3)或是(100%32, 3, 3)如果是最後一批batch;所以weight table需要與training data一樣的方式被餵進模型,如下:
# Define model structure
weight_input = Input(shape=(3, 3)) # -> define weight input layer
data_input = Input(shape=(5,))
dense_layer = Dense(3)(data_input)
data_output = Activation('softmax')(dense_layer)

# Build model
model = Model([data_input, weight_input],
              data_output) # -> define weight input layer

# Compile model
model.compile(optimizer='Adam',
              loss=custom_loss,
              metrics=['accuracy'])

# Fit model, i.e., training
model.fit(x=[train_X, weight_table],
          y=[train_Y],
          epochs=100,
          batch_size=32) # -> feed weight table into training